
Generate Icons for Prefabs is a simple unity 5 editor extension to make icons painless for hundreds of 3D prefabs.
To understand the global principle, feel free to look at the presentation video.
You can grab this Unity3D asset here
Get started
1 – Import the package
2 – open the “ExampleSimple” scene in J4F/GenerateIcons/Example/
3 – Select the Generation Cam
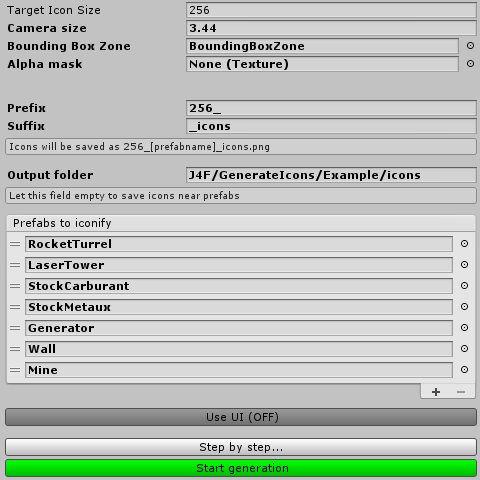
The Generation cam object is the tool itself. All is here to setup your icons :
Options :
- Target icon size : Exported image size. Change the preview aspect. Please note that the game viewport must be equal or greater of this size.
- Camera size : change the size of the cam. Lets you define the size of the gameobjects on iconsCamera size : 2Camera size : 5
- Bounding Box Zone : Just a helper cube to view the size of your object in future icons. It helps also to find a good camera angle. While generation, this box is hided. I advise you not to delete it.
- Alpha mask : Give to the tool a transparency shape texture.Using an alpha mask to shape the icons
- Prefix and Suffix : Define your naming conventions. Your icons will be saved as “[Prefix][Prefab name][Suffix].png”
- Output folder : Set the target path for icons generation. Root is your asset path (project view). The target folder mus exists.
If you let this field empty, the icons will be created in the same folder that each source prefab. - Prefabs to iconify : Manually add prefabs to the generation process. (You can also use QueueProviders like the AdditionnalQueueProvider sample)
Action buttons :
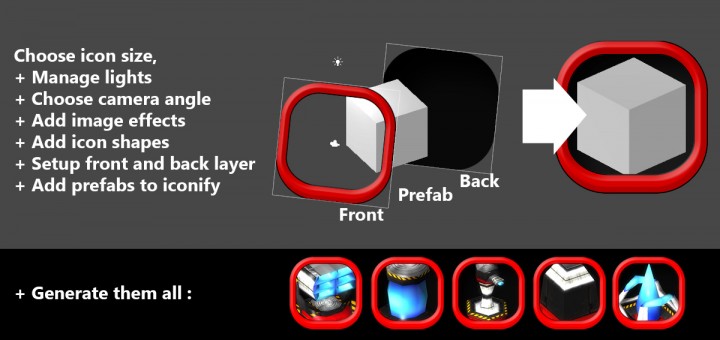
Use UI (ON/OFF) : Switch the UI icon enhancer. Lets you add a layer over the prefab and one background.
Step By Step : will show the generation process step by step. Lets you see the final icon aspect to play with lights and camera to find the perfect output before a massive generation.
Start generation : Let’s go for the generating batch. All icons in one click 🙂
Advanced options
Playing with UI canvas
To setup the look of your icons, if you do not simply want transparant items, you’ll need to use two UI canvas. To play with them, you will find them in hierarchy, as child of the Generation Cam object.
To enable / disable UI, please use the Use UI (ON/OFF) button.

Image effects
You can use image post-processing effect to make your icons more beautiful. You can use the ones from Unity’s standard assets or create your own ones.
Please note : if you want the effect not to affect your alpha mask shape “move up” the effects components over the “Generate Icons” script.
Using queue providers
Queue providers let you make automated lists of prefabs to “iconify”.
The Generate Icons tool will seek for every “QueueProvider” script (or inherited ones) attached to Generation Cam.
To see a functional example, please look at the ExampleProvider scene in example folder.
To add your own Providers, just extend the QueueProvider class as the given example :
using UnityEngine;
using System.Collections;
using System.Collections.Generic;

/// <summary>
/// Make your own extended class and add them to the "Generation Cam" object
/// In this sample, just a public list
/// If this script is enabled, the gameobjects in this list will be added to queue
/// </summary>

// 1. Extend the J4F.QueueProvider class
public class AdditionnalQueueProvider : J4F.QueueProvider
{
 public List<GameObject> addPrefabList;

 // 2. Override this function to provide a Gameobject list
 public override List<GameObject> GetPrefabs ()
 {
 return addPrefabList;
 }
}
Limitations
- You cannot use the generation tool in WebPlayer mode because of the WriteAllBytes security issues.
- You need a visible game viewport with a resolution equal or greater of the target icon size
 Rejoinds moi sur le discord de Stadia FR


